A note of caution, there are settings in the control panel which can alter mail flow. Avoid changing any settings that you are unsure of. The following settings should cover the majority of user’s needs. If unsure please contact helpme@cloudheroes.com for further support.
Logging In
To access the spam filter go to https://spamcontrol.myonlinecloud.co.uk (Make sure you include https://).
Enter the Username and Password that we provided for your account and you’ll be taken to the Domain Manager where you can see the domains you have access to.
Click the Manage Domain link next to the desired domain to access the control panel.
From here, you’ll be able to see statistics of email activity.
Message Log
To view a log of messages that have passed through the filter head to the BASIC tab and then to the
Message Log link. It is normal for this page to take a while to load.
In the Log Display you will see a list of all mail which has been scanned by the spam filter. You can search and sort for mail by using the filters located at the top.
Pressing the + button will allow you to add an additional field to the filter to refine searches further. In the
above example, a search by time and date has been added to a search for messages from a single address.
Once the records have loaded in the message log table you will be able to see the status of emails searched for. Here is a breakdown of the actions taken by the filter:
An email which has passed through the filter with no issue will show Allowed. The Delivery Status column will show if delivery was successful.
If the email has been sent from a whitelisted source, it will say Whitelisted. The Reason column will show which whitelist was used.
By default, a Tagged email will be edited to include a tag in the subject line to offer a warning to the
recipient. Usually the tag used is ***SPAM***. The Reason column will show the criteria used to tag the
message.
If an email shows as Blocked in the Action column there are several possible explanations that will appear in the Reason column. For example, it may contain a virus, have a poor reputation, a high spam score (based on several criteria) or contain a suspect link (in which case the reason will show ZeroHour Intent).
If a message has been blocked but you wish for it to be delivered, click on the email to highlight it and then click the Deliver button at the top of the table.
Spam Checking
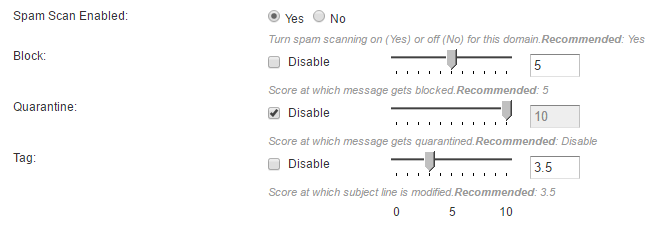
To adjust the sensitivity of spam blocking and tagging, head to the BASIC tab and then to Spam Checking.
Adjusting the sliders will change the sensitivity of the corresponding filter. The scale ranges from 0 (Least likely to be spam) to 10 (Most likely to be spam). The Quarantine option will change the level of spam that is sent to a quarantine email address. If you have not set up a quarantine address then this should be disabled.
Setting the Spam Scan Enabled option to No will turn off the spam filter completely (not recommended).
Sender Filters
To manage your whitelist and blacklist, click the BLOCK/ACCEPT tab and then select Sender Filters.
From this page, you will be able to manage the whitelist by using the top table (Allowed Email Addresses and Domains) and the blacklist by using the bottom table (Blocked Email Addresses and Domains).
To add to a list, enter a domain or email address to the first box, and then add an optional comment to the second. You can then click Add to save your changes. If you wish to remove an address from either list, click the bin icon at the end of the row.
You may whitelist/blacklist individual accounts by typing their full email address in to the tables.
Adding a domain will mean that all accounts using that domain will be whitelisted/blacklisted. It is not
recommended that you add domains with many unknown users (such as gmail.com or outlook.com) to the whitelist. This will mean any account on the entire domain will be allowed through the filter without being checked.
If known, use an IP address instead of a domain name. This will prevent receipt of spam from whitelisted domains that have been spoofed (where messages claim to be from a domain but originate elsewhere).
If you receive spoof spam emails that appear to be from your own domain, click the Advanced tab and then Email Protocol and set the option Reject messages from my domain to Yes.


