The following steps will guide you through how to setup your Cloud Heroes E-Mail account with Outlook 2013, using the POP3 protocol.
Step 1 – Open Outlook
If this is the first time you have used Outlook, the programme will walk you through the following stages. Otherwise, click FILE, then Add Account.
Step 2 – Add Account
On the Add Account dialogue that appears, select Manual setup or additional server types and then click Next.
Step 3 – Select Account Type
On the next screen, it will ask you what type of account you would like to set up. To connect to your IMAP account, you will need to select POP or IMAP and then click Next.
Step 4 – Account Details
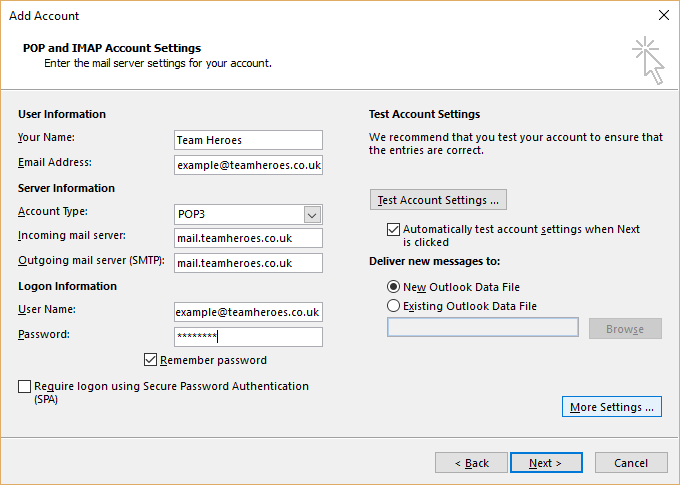
The next screen will ask you for details relating to your account. Fill in the following details using the information that Cloud Heroes have provided.
Your Name
This is the name you would like to appear to anyone that receives an email. It might be your own name or the name of your company or department, it’s up to you.
Email Address
The address provided for you by Cloud Heroes and will follow the format name@yourdomain.co.uk or similar.
Account type
Leave this set as POP3. This will mean that all of your emails will be downloaded from the server and stored locally on your machine.
Incoming mail server and Outgoing mail server (SMTP)
This is provided for you by Cloud Heroes and will follow the format mail.yourdomain.co.uk or similar.
User Name
Provided for you by Cloud Heroes and will usually be the same as your email address: name@yourdomain.co.uk or similar.
Password
Provided for you by Cloud Heroes. Leave remember password checked if you don’t want to enter it every time you check your email.
Require logon using Secure Password Authentication (SPA)
This should be left unchecked.
Once you have filled out all of this information, your screen should look something like the below. Before you click Next, please proceed to Step 5.
Step 5 – Outgoing Authentication
To ensure your emails are sent out via our mail server, we require that you authenticate using your email address and password.
T o enable this, click More Settings. Then navigate to the Outgoing Server tab and make sure My outgoing server (SMTP) requires authentication is checked and select Use same settings as my incoming mail server
Step 6 – Leave a Copy of the message on the server.
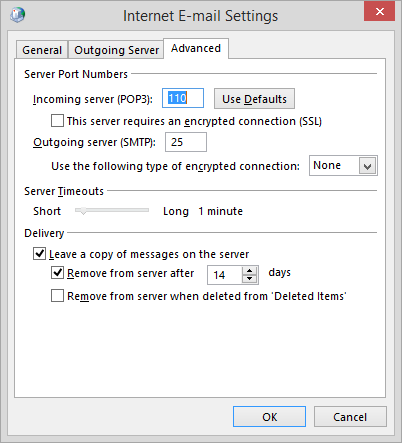
To retain copies of your emails on the server, go to the Advanced tab and review the options under the Delivery section.
You will need to check the box for Leave a copy of messages on the server and also check the box for Remove from server after. Then enter the amount of days you want the message to be retained.
The mailbox on the server has a size limit so you may need to review these settings at a later date if the mailbox becomes full.
Step 7 – Finishing Off
Once that has been done, Click OK and then Next. Outlook will now test the account settings.
If all the details have been entered correctly, you will get this message.
To start using your email account, click Finish


