The following steps will guide you through how to setup your Cloud Heroes E-Mail account with Outlook 2013, using the IMAP protocol.
Step 1 – Open Outlook
If this is the first time you have used Outlook, the programme will walk you through the following stages. Otherwise, click FILE, then Add Account.
Step 2 – Add Account
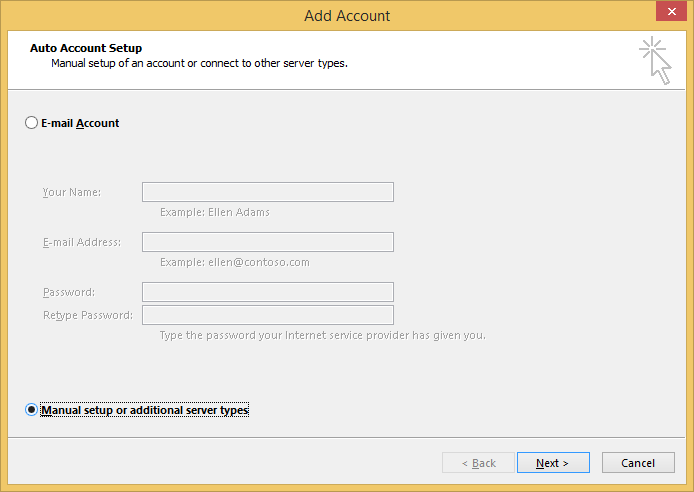
On the Add Account dialogue that appears, select Manual setup or additional server types and then click Next.
Step 3 – Select Account Type
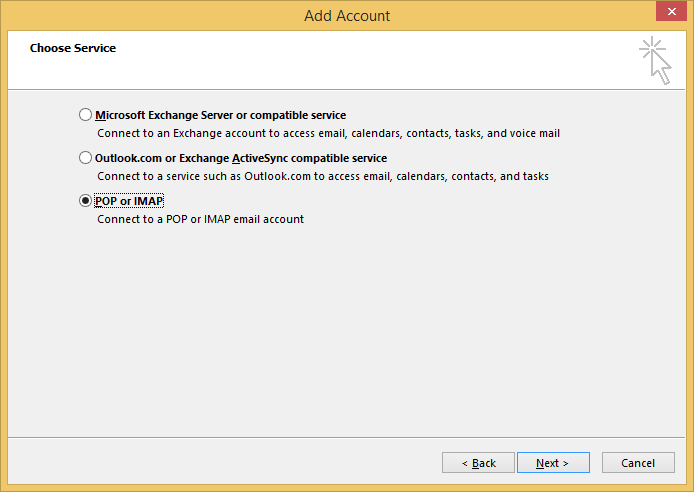
On the next screen, it will ask you what type of account you would like to set up. To connect to your IMAP account, you will need to select POP or IMAP and then click Next.
Step 4 – Account Details
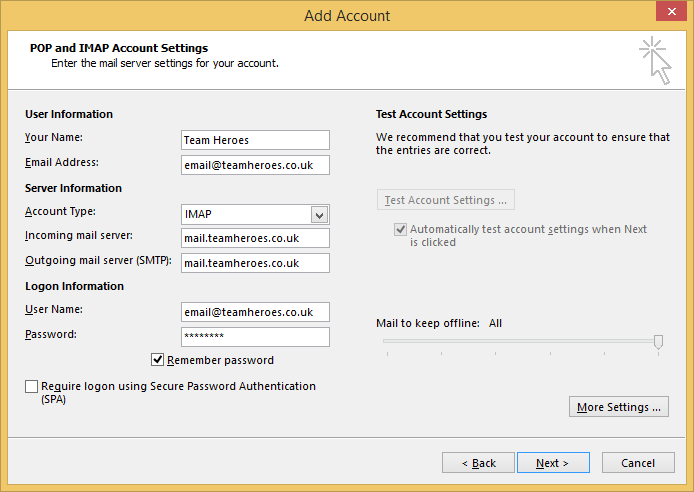
The next screen will ask you for details relating to your account. Fill in the following details using the information that Cloud Heroes have provided.
Your Name
This is the name you would like to appear to anyone that receives an email. It might be your own name or the name of your company or department, it’s up to you.
Email Address
The address provided for you by Cloud Heroes and will follow the format name@yourdomain.co.uk or similar.
Account type
Changing this from POP to IMAP will enable your emails to be synced over multiple devices and be stored online. (Remember, your IMAP mailbox will have a size limit so you will need to archive or delete older emails as it fills up.)
Incoming mail server and Outgoing mail server (SMTP)
This is provided for you by Cloud Heroes and will follow the format mail.yourdomain.co.uk or similar.
User Name
Provided for you by Cloud Heroes and will usually be the same as your email address: name@yourdomain.co.uk or similar.
Password
Provided for you by Cloud Heroes. Leave remember password checked if you don’t want to enter it every time you check your email.
Require logon using Secure Password Authentication (SPA)
This should be left unchecked.
Once you have filled out all of this information, your screen should look something like the below. Before you click Next, please proceed to Step 5.
Step 5 – Outgoing Authentication
To ensure your emails are sent out via our mail server, we require that you authenticate using your email address and password.
 To enable this, click More Settings. Then navigate to the Outgoing Server tab and make sure My outgoing server (SMTP) requires authentication is checked and select Use same settings as my incoming mail server.
Step 6 – IMAP Folder Path
 It is recommend that the Root Folder Path is changed so that all of your IMAP folders are configured correctly (Sent Items, Deleted Items, Drafts and Junk Email). To set this, Click the Advanced tab and type Inbox in the Root folder path field.
Step 7 – Finishing Off
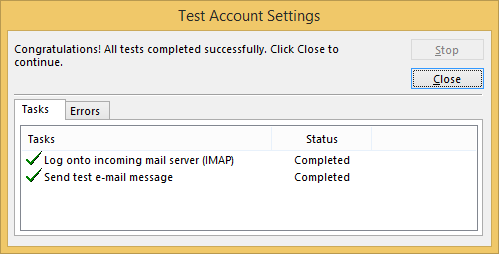
Once that has been done, Click OK and then Next. Outlook will now test the account settings.
If all the details have been entered correctly, you will get this message.
To start using your email account, click Finish


